Your Cart is Empty
Recent Articles
- Efficiency Meets Innovation: SketchUp 2024 Unveiled
- Maxon One Spring 2024 Release Packs Particle Power, Toon Shading, and More
- TurboCAD 2024 Unveiled by IMSI Design: Discover the New Features and Enhancements
- Exploring the Latest InfraWorks 2025 Updates
- Introducing the Latest Innovations in Autodesk's ReCap Pro 2025
- Discover the Latest Enhancements in Civil 3D 2025
- Exploring the Newest Features and Enhancements in Revit 2025
- Explore the Latest Features in Vantage 2.3 Update
- Explore the Latest AutoCAD 2025 Enhancements: Activity Insight, Smart Blocks, and Apple Silicon Support
- Unveiling Enscape 4.0: Revolutionizing Design with Unified Experience for macOS and Windows Users
Create a Realtime Walkthrough of Your Revit Project with Autodesk Showcase
September 03, 2014 8 min read
Editor's Note: We are big fans of Evan Troxel's work and we are thrilled to be able to publish an original blog post from him on the Novedge Blog. Enjoy!
Find out more about Revit, Showcase and Autodesk Suites on the Novedge website.
The views, opinions and positions expressed within guest posts are those of the author alone and do not represent those of Novedge.
Revit is a great tool for creating highly detailed architectural models and the construction documents needed to get them built. Along the way from concept to a real building, there will be times when you want to take a stroll through your project, and probably let the client experience your design as well. This is where Showcase comes in. If you have a perpetual license or a subscription to an Autodesk Suite you probably already have access to it, and you didn’t even know about it or what it’s supposed to be used for.
Autodesk: "Showcase® 3D visualization and 3D presentation software provides easy-to-use presentation and design exploration tools for architects, designers, engineers, and marketing professionals. Quickly transform 3D CAD models into interactive walk-throughs and presentations, so that you can evaluate aesthetic and design alternatives in real time with peers, constituents, and customers."
As it says on the Autodesk website, Showcase is a design exploration tool, and if you have a laptop or desktop computer with a decent Graphics Processing Unit (GPU) you’ll be walking through your project in no time with this tutorial. If you’d then like to modify building materials, do sun and shadow studies, or slice into a building, you can do all that and more – in realtime. You can even produce final renderings with it, making it even more useful. The minimum system requirements for Showcase are surprisingly low, but it really depends on how complex your scene is. For instance, if you have a single building versus multiple buildings, have all of the interior and exterior furniture visible, plumbing fixtures, etc., they are all going to take more horsepower to render. If you don’t need to see something, make sure to hide it in your Revit file before you export your file to Showcase. The less geometry you bring in, the better.
Revit is well known for its modeling power and ability to automatically create 2d drawings from the architectural model. Multiple people can be working in the same file at the same time which further pushes the speed at which a project can go through the documentation phase. It’s a great tool to very quickly start seeing the building develop in 3d. Where Revit falls a bit short, however, is in the presentation graphics aspect of a project. While it can show 3d perspective views, it is cumbersome to use. That’s fine because I’m going to show you how to get around that little problem.
Modeling & Exporting to Showcase
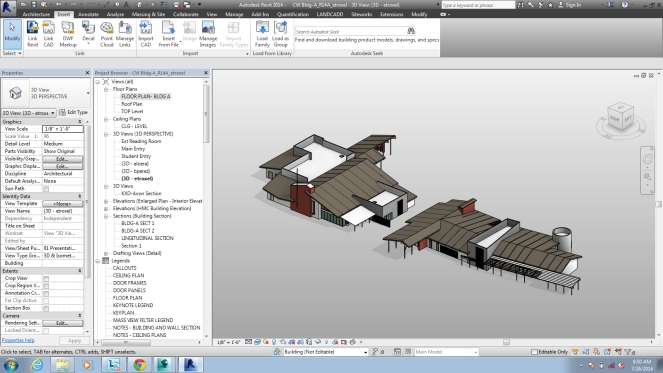
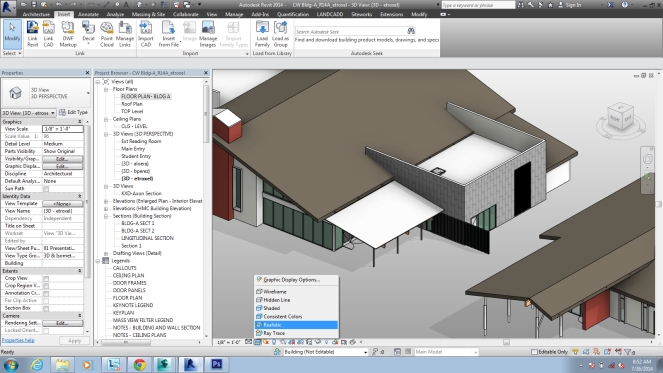
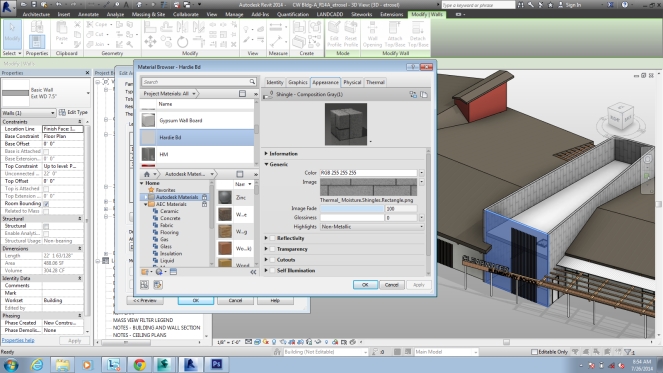
The first step is obviously to build your model. Take care during this stage to get your materials setup as well as you can. No, they don’t have to be perfect, but the more work you do in Revit the less you’ll have to do later. Since this isn’t a modeling tutorial, I’m going to assume you already know how to make a building in Revit. Make use of the Autodesk Material Library that is built into Revit because it translates well to all of the other Autodesk products. I like to view my model in Realistic Mode so I can see what the materials look like in Revit before I export them.
The 3d Model
Realistic Graphics Mode
Revit Material Editor
Here’s really the only thing you need to know about getting your model out of Revit: whatever you see in the 3d window is going to get exported and show up in Showcase. Hide everything you aren’t going to see in the walkthrough. Just select an object, right click and hide the elements or categories. You alternatively could go into Visibility Graphics (VG) and hide entire categories there as well. I usually hide plumbing fixtures and any other high-polygon count objects. They will just slow down your scene later. If you are going to take your tour into the bathrooms, don’t turn them off :)
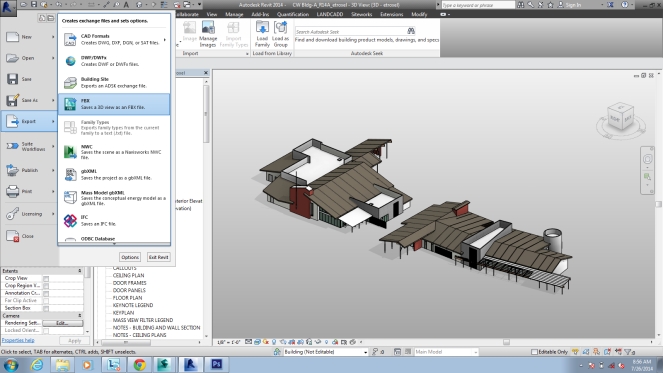
Use the FBX format when exporting because it retains all texture information as well as many other scene properties like IES light types and more. Once you have exported your FBX file, you can import that into Showcase.
Export FBX Format
Showcase Setup
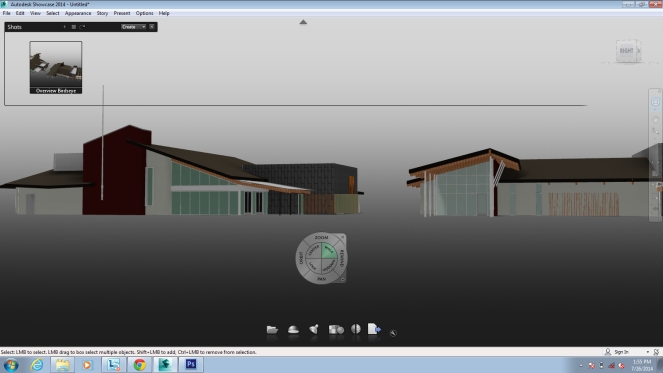
Now that your model is in Showcase, you should familiarize yourself with the controls. One of the first things I like to do is setup a few Camera Shots. Navigate around your scene using the steering wheel tool which you are probably already familiar with from Revit. Once you have a view you like, make a Shot out of it. Do this in the Story > Camera Shots pull-down menu.
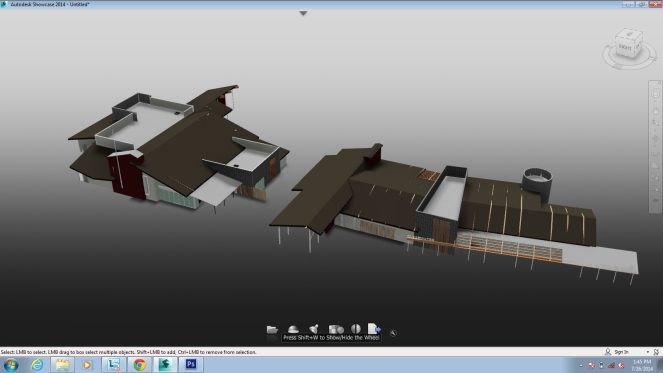
The Model in Showcase
Camera Shots Palette
A dialog box will show up that allows you to make some decisions about what type of shot you are making and allow you to name it. Once you make your decisions, close it and move around your scene and do it again. The steering wheel is your friend. Type Control-W on your keyboard to quickly access it. Spend some time learning how it works if you don’t know already. It’s the same in all Autodesk 3d products that have it.
Steering Wheel Navigation
The Shots all show up at the top of the screen and let you jump to them instantly with a single click. This can be a shortcut for later if you ever get lost while walking through your model. Just click one of the thumbnails and get back on track easily.
Setting Up Materials
Once you have your shots mapped out, it’s time to begin adjusting materials in the scene. Revit’s texture controls leave something to be desired. Showcase on the other hand gives more control over their application and placement. In my scene, I was not happy with the look of the glass from Revit. I can’t even see through it! It’s easy enough to fix though. Let’s take a look how.
The “Before” Glass
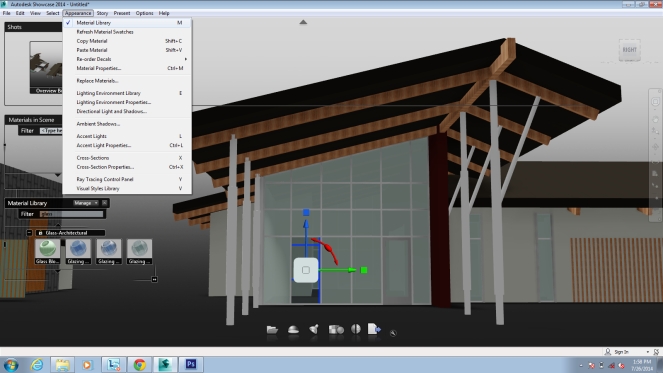
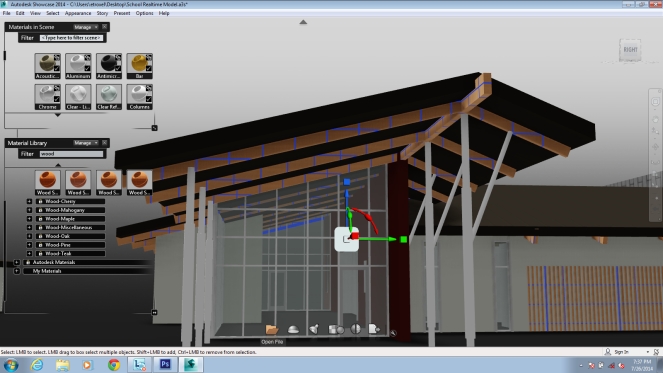
Open up the Materials Palette by using the Appearance pull-down menu and selecting Material Library. Once that opens up, you can simply type in a material name and see lots of examples of options. In this case, I like the look of one of the suggestions. Select a lite of glass, right click on it and select all of the objects that use that material. They will all highlight with a moving blue grid which will give you a visual cue of what has been selected. You can then right click on the material you like in the Material Palette and assign it to your selection all at once.
Assigning a New Material
Now I’ll replace the wood texture that came from Revit with a much nicer one in Showcase using the same technique.
Assigning the Wood Material
Setting Up Lighting & Environment
The default lighting and environment are pretty drab when you first import your model into Showcase. The grey gradient background just doesn’t do anything for me, and I don’t think my clients want to see their project that way either. Maybe the Showcase team decided by making it so dull that it would force us to change it to something better. Hey, it worked!
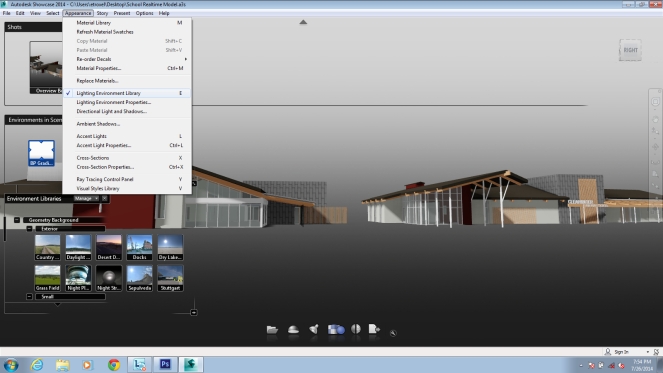
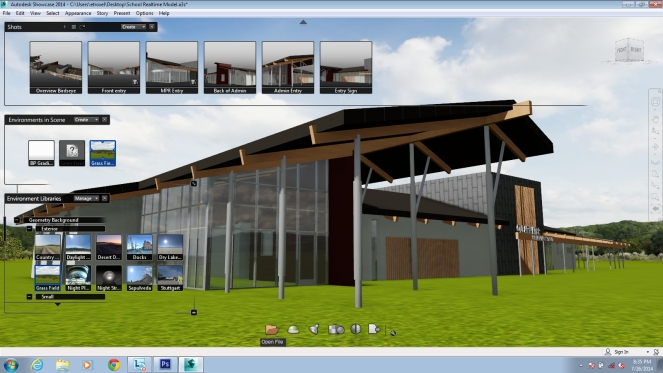
Under the Appearance pull-down menu, there is a Lighting Environment Library options. Choose that option and navigate through the palette until you find something you like. I chose the Grass Field example and it brightened up the scene nicely. If you’d rather use your own HDR file, you absolutely can. This is in fact a great way to see how your scene looks in its real environment if you have the ability to go out and shoot an HDR of the real location. Image based lighting (IBL) is a way to light a scene with just a single image and you don’t have to set any complicated lighting system up. In simple terms, it takes the brightness and colors of the pixels in the image and uses them to light the scene.
Assigning a New Environment
You can now see that with the updated glass material and the new background that the building is presented much more realistically with reflections and everything. Sweet. Beyond just the background changing, the whole lighting system is also changing because it’s based on the HDR file used for the environment. If you load in a dusk shot, the scene's lighting will change to look like dusk. It’s all very cool technology at work here.
The New Environment
The Walkthrough
You can now walk through your project using the steering wheel or your shortcuts from the Shots palette. The background will move appropriately as you walk around. It’s a lot like a first-person video game at this point and it can be a whole lot of fun to watch your client’s face at this stage. They just light up with excitement!
Creating Renderings and Cross-Sections
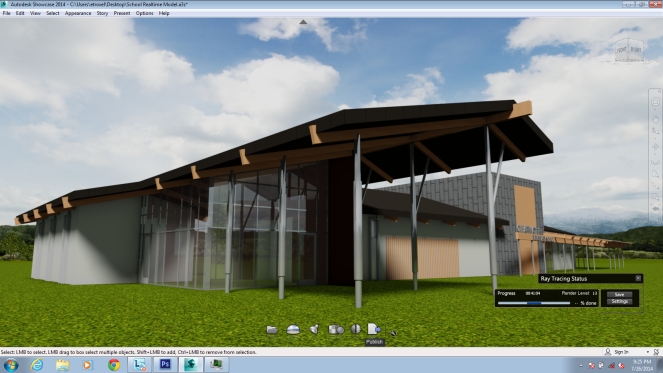
There are a couple of other benefits I talked about in the beginning of this article – rendering and sections. Showcase has a very nice built-in ray tracer that has the ability to give you photo real imagery as opposed to the hardware rendering we’ve been talking about that is used for the realtime stuff. To enable ray tracing, go to the View > Ray Tracing or press the R key. Here’s an example of the same view ray traced compared to the previous image that was a hardware rendered view. As you can see, the shadows and reflections look even better. This gives us a much more realistic image of the project at the expense of time. Yes, ray traced images can take a long time to create depending on the settings we use, the complexity of the scene, and the processing power of the computer we’re using.
Ray Tracing an Image
3d sections can also be generated if you’d like to get an interesting look into the insides of your model. In the Scene pull-down menu, select Cross-Sections and also make sure that Show Cross-Section Grips is enabled in the same menu. The Cross-Sections palette will show up and from there you can create a cross-section plane. Something else that is a helpful tip here is that you can hide the planes themselves because they do get in the way visually. Go into the Organizer (O) and in there you can select the section plane and hide it.
Cross Sections
Conclusion
That’s it! Obviously there are a lot more things you can explore in Showcase, but I hope this wets your appetite. As I said in the beginning, Showcase is a program you probably didn’t even know you had.It’s a fun and powerful way to present and explore your projects internally or with clients. I’ve been using it ever since I found it on my computer and I have to say my clients love seeing their buildings this way. It beats communicating with technical drawings any day. Have fun with it!
Find out more about Revit, Showcase and Autodesk Suites on the Novedge website. And if you have quesitns, don't hesitate to call us at 866.362.8970.
Read more from Evan Troxel on his blog, listen to his Archispeak Podcast and learn more from Method.
Related articles
Also in NOVEDGE Blog
Maxon One Spring 2024 Release Packs Particle Power, Toon Shading, and More
April 10, 2024 4 min read
Read More
TurboCAD 2024 Unveiled by IMSI Design: Discover the New Features and Enhancements
April 10, 2024 2 min read
Read MoreSubscribe
Sign up to get the latest on sales, new releases and more …


