Your Cart is Empty
Recent Articles
- Efficiency Meets Innovation: SketchUp 2024 Unveiled
- Maxon One Spring 2024 Release Packs Particle Power, Toon Shading, and More
- TurboCAD 2024 Unveiled by IMSI Design: Discover the New Features and Enhancements
- Exploring the Latest InfraWorks 2025 Updates
- Introducing the Latest Innovations in Autodesk's ReCap Pro 2025
- Discover the Latest Enhancements in Civil 3D 2025
- Exploring the Newest Features and Enhancements in Revit 2025
- Explore the Latest Features in Vantage 2.3 Update
- Explore the Latest AutoCAD 2025 Enhancements: Activity Insight, Smart Blocks, and Apple Silicon Support
- Unveiling Enscape 4.0: Revolutionizing Design with Unified Experience for macOS and Windows Users
Productivity Tips for Maxwell Render when used with SketchUp – from the Plugin Developer Himself!
May 07, 2014 9 min read
Editor's Note: Jeremy Hill is a veteran of Maxwell Render, working on its development with the team at Next Limit Technologies for almost 10 years. In this timely blog post he gives us specific and in depth technical information on making the most of it when used in conjunction with SketchUp.


Images by Rune Skjøldberg runes.nu
Though a primary aim of Maxwell Render is to provide simplicity, it is nevertheless the case that rendering is a very technical discipline, which makes heavier use of machine resources than most other types of software. In the following, I will discuss some perhaps not obvious tips for minimizing memory usage, and speeding up both workflow and rendering, in the context of the Maxwell Render plugins for SketchUp*.
Memory Usage and Export Performance
Though rarely a factor in 64-bit applications, memory usage is of primary concern in SketchUp, since it is still 32-bit. This is especially true when we consider rendering within the application, since there must be enough memory available to hold both the model as it exists in SketchUp, and a representation of that, translated (a.k.a. exported) into the internal data format of the render engine.
The primary way of dealing with this in Maxwell is to move rendering outside of SketchUp's process, by exporting and rendering an MXS file in (64-bit) Maxwell Studio or Maxwell Render – available in Maxwell Render Suite. For large models though, even just exporting the model can stretch the limits, and besides, it is not an option in the Maxwell for SketchUp Standalone version of the plugin, where rendering is done within SketchUp, using the Maxwell FIRE window. It is therefore beneficial to employ memory-conserving techniques in the construction of the model itself, and here, there are two main approaches, involving the use of:
– Component Instances
– Maxwell MXS References
Where each Group in SketchUp directly contains a unique set of faces, every instance of a given Component refers back to a single definition, which itself is very much like a Group, albeit one that does not actually appear in the model. A similar approach is used in Maxwell's format, which uses both meshes (each Group and Component definition results in a mesh), and instances of meshes (each Component instance results in an instance), to represent the model. As such, where the choice is between making a copy of a Group, and turning that Group into a Component and making an extra instance, the latter should usually be preferred, for two reasons:
– Instances use less memory, in both SketchUp and Maxwell.
– It is much faster to export an instance than a mesh.
However, there is a balance to be found, since it is entirely possible to create a Component containing very few faces, or even just one. In such a case, we may lose ground both in terms of memory usage and performance, since an instance itself does require some memory (e.g. name, material assignment, transformation, etc), and since it requires more work to refer to one thing through another, than to refer to it directly. Concretely, this means that when constructing something like a tree, rather than creating 1000 instances of a Component containing a single leaf, it would be better to use, say, 10 instances of a Component containing the faces for 100 leaves.
All of this applies equally to the creation and use of Maxwell MXS References, which are a special type of Component created by the plugin, and which, instead of containing geometry to render, refer to an external Maxwell MXS file, to be loaded at render-time by Maxwell. In SketchUp, the MXS file is represented using a lightweight set of bounding boxes derived from the geometry it contains, making MXS References negligible in terms of their memory usage and performance impact within SketchUp. However, they do hold the potential of quite easily exhausting available memory when rendered in Maxwell FIRE, since an MXS may well contain GBs of geometry, so some discretion is in order. That said, being Components, it is only meshes from the first occurrence of a given MXS reference that are costly, since remaining instances of the reference, and the meshes it contains, will be exported as instances for Maxwell.
Another opportunity for memory and export optimization lies with the avoidance of overly large textures. A texture detail smaller than is visible through a single output image pixel contributes nothing to the output image, but still has costs in terms of memory usage. Regardless of the size of an image file on disk, its size in memory is directly related to its pixel dimensions, and for images in compressed formats, the difference can be substantial. For example, though a 10,000 x 10,000 24-bit PNG may use less than 100KB on disk, it will require nearly 300MB in memory (or close to 400MB for a 32-bit image). Besides raw memory usage, there is also the work required to decompress and compress whenever the image is read from or written to disk, which comes into play with rendering, since images stored inside the SKP file must be written to disk by SketchUp, in order for them to be rendered by Maxwell.
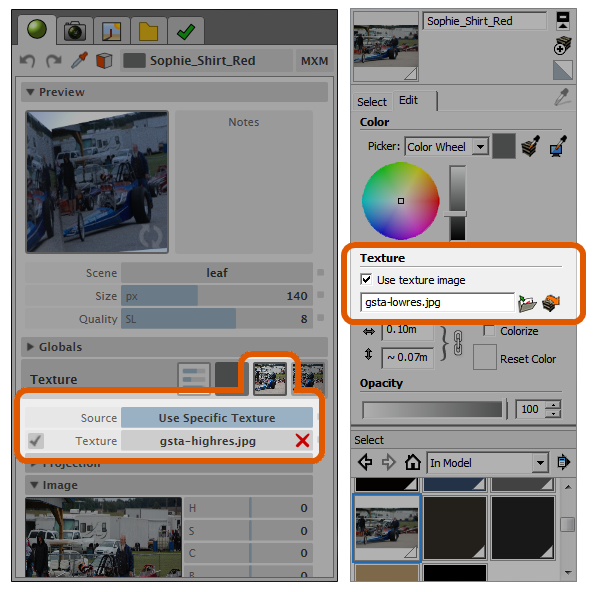
When it is not possible to actually reduce the resolution of textures used, the plugin provides alternate workflows that can help. First, there is the fact that a material in the plugin may refer a texture outside of SketchUp, by explicitly assigning it to the material's Color Texture; a reduced-resolution copy of the texture can then be assigned in SketchUp's own material editor, minimizing the memory requirement in SketchUp. Similarly, a material in the plugin may link to an external Maxwell MXM file, which in turn refers to the full-resolution textures. To ensure that textures appear mapped as expected, it is important, when using either of these strategies, to ensure that the reduced-resolution texture retains the aspect ratio of the original.
 Rendering Performance
Optimization of rendering performance is a broad topic, Maxwell essentially being a simulation program, much as any other type of simulation program (e.g. FEA, CFD). The main difference is that where other simulators produce tables of data, visual stress diagrams, and so forth, Maxwell's output is an image that we perceive as a photograph. What that image really represents, though, is a quantity of work completed within a given time span, where work means figuring out what happens to rays of light when they bounce around in the scene, and where time refers to how long we allowed it to work, before telling it to stop (it would keep going forever, calculating more and more light, if we let it). The reason the output of this particular simulator looks like a photograph is simply that in the real world, a camera captures the same phenomenon: light that has reached its film or sensor, after having bounced around in the world.
This being the case, the most important thing to appreciate is that in terms of improving rendering performance (and quality), it is necessary to ensure that the input to the simulation is realistic. Were we to run an FEA simulation with incorrect material and stress inputs, we should hardly expect to obtain a useful result, and it is really no different with Maxwell. To enable you to deal with this without needing to have a PhD in physics, Maxwell models its interface using real-world analogies: there is a camera with real-world camera settings, materials defined using real-world concepts, and so forth, and to be successful, it is necessary to use them as such. Meaning, for example, that if a scene is rendering darker than expected, rather than simply increase the output of an emitter material to a million watts, it would be far better to figure out the real reason for the result; perhaps the problem is that camera's exposure is not realistic, or that the scene is modeled at 10X the size it is supposed to be. Such factors can affect not only how the output image looks, but how quickly it renders, as well.
Often, in addition to making sure to use the Production engine, and all available Threads (set in Maxwell FIRE Settings, and in the Scene Manager's Output tab), improving rendering quality and performance is less about learning new concepts, and more about unlearning old ones originally learned through the use of other, less physical rendering software. When approaching the question of how to design a model, or how to solve a particular problem, always make sure to remember that because of Maxwell's adherence to physical principles, we have an entire world of information available, which has nothing to do with rendering. In other words, prefer to search out solutions from the real world of photography, rather than rendering-specific sources, whether the question concerns anything from how to set camera depth of field, to how to set up lighting for a studio shot. For questions not easily addressed this way, be sure to consult the official Maxwell documentation.
General Workflow
Much as SketchUp handles material assignments, the plugin implements various object-specific rendering parameters using an inheritance model, where setting a value on a Group or Component will affect everything it contains, unless specifically overridden. For example, consider a problematic situation involving a tree model, which has had custom texture position applied to every one of its leaves. To accomplish an accurate translation of the model, the plugin must ask SketchUp to write a custom texture for each positioned face (this can take a very long time), even though the positioning may actually be negligible. When that is the case, we can instruct the plugin to ignore the positioning for the tree's Group by setting UV Coordinates to Ignore Distortion in the Maxwell context menu. To override this on a particular contained sub-Group, we can set UV Coordinates to Default SketchUp on that Group. It works the same for the Hide and Separate By parameters, as well as those found in the Object Properties window.

Another important point to mention, pertaining to the use of textures (and other externally-referenced files), is the plugin's Search Paths feature, which is found in the Options tab of the Scene Manager window. While it is doubtless very useful to have invalid paths auto-corrected, it should also be understood that this feature is not intended to be used for the purpose of implementing workflows that intentionally or routinely result in the use of non-existent paths. Reason being, while it is nearly instantaneous for the OS to confirm that a file exists, the same is not true when it doesn't. For example, consider a path pointing to a file on a remote machine: in order to determine whether the file exists, the OS must first establish a connection with the remote machine. If that machine is not immediately available, the OS must wait a reasonable amount of time before concluding that it does not exist.
Beyond this, it is also important to avoid the use of an unreasonable Search Depth and/or number of Search Paths, since when a file cannot be found, it will be checked using all available directories. This can take a good deal of time, seeing that even a single Search Path can potentially result in a large number of directories being searched, given even a relatively low Search Depth value.
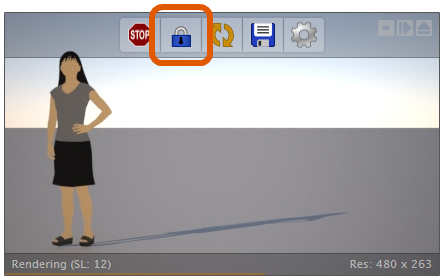
Aside from these technical details, there are a couple other things that may be worth mentioning. One regards Maxwell FIRE: though it is good to be able to get instant feedback on changes, this can become a problem when rendering final images, since any inadvertent change to the view will trigger an auto-update and restart of the rendering. The solution is to engage the Lock toggle-button found in the Maxwell FIRE window.

Another thing that can be difficult to deal with is camera focus; though this can be managed manually using the plugin's Set Focal Distance tool, it can also be handled automatically, by setting Focus to one of the automatic modes in the Camera tab. These modes work by tracing a number of rays from the camera into the scene, in order to determine the actual distance of objects currently within the frame.

Conclusion
As initially mentioned, rendering is inherently a very demanding technical discipline, and especially so, if your particular needs require the level of fidelity offered by Maxwell Render. Though abstraction of the details involved is a noble goal, which we earnestly pursue, the fact remains that were the process to be reduced to the flipping of a single switch, those details would not really have disappeared. Hopefully the information provided above will shed light on some of the perhaps less-than-obvious factors involved, and thereby help you to become more productive in your use of Maxwell Render’s plugins for SketchUp.
*As referenced above, Maxwell Render offers multiple options for SketchUp users:
Maxwell for SketchUp Standalone plugin:
Maxwell for SketchUp V3 – Free
Maxwell for SketchUp V3 – Licensed
Maxwell Render Suite which includes the plugin for SketchUp as well as over 15 other 3D/CAD applications:
Maxwell Render V3 Learning Edition
Maxwell Render Suite V3 Node Locked
Maxwell Render Suite V3 Floating +10 rendernodes
Related articles
 Franco Folini: Q&A with Mihai Iliuta: Novedge Webinar #58 – Studio Lighting Techniques Using Maxwell Render
Also in NOVEDGE Blog

Maxon One Spring 2024 Release Packs Particle Power, Toon Shading, and More
April 10, 2024 4 min read
Read More
TurboCAD 2024 Unveiled by IMSI Design: Discover the New Features and Enhancements
April 10, 2024 2 min read
Read MoreSubscribe
Sign up to get the latest on sales, new releases and more …


